Whilst browsing a great indie game site known as GameJolt, I came across a rather stunning game known as Bernband. This game offers quite a unique experience having no story or goals, but rather a mazelike alien city filled with unique sounds and visuals for you to explore and enjoy. What really captured me most about this game was the retro feeling pixelated graphics that the developer had created. Although I have no personal experience in the world of game art, I felt that I needed to find out just how this game had achieved such a charming look.
After searching the web and testing out multiple different techniques I finally settled on a method that gives the following result.
After searching the web and testing out multiple different techniques I finally settled on a method that gives the following result.
In order to achieve this effect I used render textures, which I believe have become a free feature in Unity 5 and later.
To recreate this effect in your scenes you can follow the following steps:
1. Right click in the project window and click Create - Render Texture
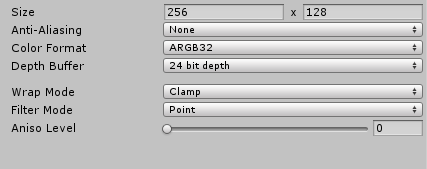
2. Change the size of the render texture. In the example above I used 256 x 128. If you want more, smaller pixels try doubling those numbers, or halving them for the opposite effect.
3. Turn off Anti-Aliasing and switch the filter mode to 'Point'.
To recreate this effect in your scenes you can follow the following steps:
1. Right click in the project window and click Create - Render Texture
2. Change the size of the render texture. In the example above I used 256 x 128. If you want more, smaller pixels try doubling those numbers, or halving them for the opposite effect.
3. Turn off Anti-Aliasing and switch the filter mode to 'Point'.
4. Create a material and assign the render texture as the material texture. For this example I used the 'Unlit/Texture' shader.
5. In your scene camera, set the 'Target Texture' field to your render texture.
6. Make a plane in your scene, somewhere far away from the rest of your scene, and assign the new material to it. The dimensions of the plane should be the same scale as the size of the render texture. For example, the size of my render texture is 256 x 128, which is a scale of 2 : 1, therefore the scale of my plane must also be 2 : 1.
7. Make a new orthographic camera looking this plane. Also be sure that this new camera is the main camera so that it renders to the screen. Adjust the size of the camera so that it matches the size of the plane.
It's as simple as that. You should now be able to see your scene with a pixelated render effect.
Whilst researching I also discovered some other creative methods to achieve a similar result.
This method has a very similar, if not identical result and works for people who do not have access to render textures for some reason or another:
https://www.reddit.com/r/Unity3D/comments/20arg7/i_made_a_script_to_make_a_unity_camera_render/
This method allows you to create a pixelated effect in certain areas of the screen rather than over the entire screen, allowing effects like the censor bar in the sims games.
http://forum.unity3d.com/threads/making-a-local-pixelation-image-effect-shader.183210/
 RSS Feed
